Saturday, May 25, 2013

Kasha, Soviet Army, WWII

     Kasha (каша) is probably most accurately defined as grain porridge. It has often been described, including in some Western intelligence manuals from the Cold War era, as a porridge made from buckwheat groats. While buckwheat is preferred in many areas, kasha is not exclusively made from buckwheat and may be made from most any whole grain, to include millet, rice, semolina, oats or barley. Soviet Army kasha consisted of grain, liquid (water, broth, whole or diluted milk), fat, and sometimes onions. Kasha was classified as fluffy, sticky or slurry, depending on the ratio between the amount of liquid and cereal grains.
          Published in 1947*, the kasha recipes given here are the World War II (Great Patriotic War, if you prefer) version. Soviet Army food was somewhat repetitive and bland by Western standards, with a preponderance of kasha, soup and bread. The diet was based on whole grains, primarily in the form of bread and kasha. These were supplemented by root vegetables and leafy greens (primarily cabbage), with small amounts of meat and fats. Much of the time the vegetables and meats were canned or dehydrated.
     When cooking kasha pay attention to the cooking time needed when making your first batch, as cooking times can vary somewhat due to differences in the grains being used. Once the grain and boiling water have been mixed together, lower the heat to prevent excess moisture loss. Slow cooking over low heat is important to insure that the grain is fully cooked, as incompletely cooked kasha is quite unappetizing. Soviet soldiers had many disparaging terms for half-cooked kasha, such as “bullets”, “bolts” or “shrapnel”. Kasha has completed cooking when all of the liquid has been absorbed and the grains are not dry inside. Sticky kasha should have a texture similar to risotto, without any excess liquid.
     If using broth, beef broth is preferred. Sunflower oil was a commonly available fat, although any type of fat may be used. Tushonka was a popular accompaniment to buckwheat or barley kasha. If adding tushonka, shred the meat into small pieces, add it to the kasha as soon as it is cooked, while still very hot, and mix well.
     The amounts given in the following kasha recipes are for one serving.

*в помошь войсковому повару, составил л.и.артамонов, поднолковник медицинской службы
 (Assistance for the Military Cook, edited by L.I. Artamonov, Lieutenant Colonel, Medical Service)

Three varieties of Soviet Army kasha, served in M36 mess tin lids. From left to right: barley, buckwheat and  oat kasha.  Each mess tin lid contains one portion. The bowls in front of the cooked kasha contain one portion of the uncooked grain. 
Soviet M36 Mess Tins. A close copy of the German M31 Kochgeschirr, it had a capacity of approximately 1.7 liters for the body and 0.5 liters for the lid.
Buckwheat Kasha, Fluffy
Toasting the buckwheat groats before boiling is basic to making good buckwheat kasha. In the US, buckwheat groats are available either raw or toasted. If you are buying raw buckwheat, take care to toast the groats only until they are lightly browned. Over-toasting will result in kasha with a burnt taste. Ten grams of finely chopped onion is approximately one rounded tablespoon in volume.

US                               Metric                         Ingredients
4.25 oz                        120 g                           buckwheat groats
6.5 oz                          180 g                           water
.35 oz (2 tsp)               10 g                             fat
.35 oz (1 tbsp)             10 g                             onion
to taste                        to taste                         salt
yield: 9 oz/250 g

Procedure
Sort through the buckwheat groats and remove any impurities.
Boil the water in a separate pot.
Toast the groats in a dry pot over medium high heat until lightly browned. Stir constantly to avoid burning. After toasting, let the groats cool for a couple of minutes.
Pour the boiling water over the groats while stirring continuously until the groats begin to swell. Then add salt to taste and cook over low heat until it thickens.
As soon as the kasha groats begin to swell, cover the pot tightly, lower the heat, c and simmer over low heat for 20-30 minutes until the buckwheat is well cooked.
While the kasha is cooking, cut the onions into fine pieces and saute in the fat until lightly browned.
Once the  kasha is nearly cooked, add the onion and mix well until it is evenly distributed.
Buckwheat groats, raw (left) and toasted (right).
Barley Kasha, Sticky
Pearled barley is used in this version. Sticky kasha requires a long cooking time which results in a creamier texture.

US                               Metric                        Ingredients
3 oz                             80 g                            pearled barley
15 oz                           400 g                          water
.35 oz (2 tsp)               10 g                             fat
to taste                        to taste                         salt
yield: 15 oz/400 g

Procedure
Bring salt and water to a boil.
Pour the barley into the boiling salted water and simmer until tender
Add the fat and mix in well, cover the pot, and let rest for a few minutes.
Required cooking time is up to 2 hours.

Oatmeal Kasha, Sticky

US                               Metric                          Ingredients
3 oz                             80 g                              oat groats
10.5 oz                        300 g                            water
.35 oz (2 tsp)               10 g                              fat
to taste                        to taste                          salt
yield: 15 oz/400 g

Procedure
Bring salt and water to a boil.
Pour the oats into the boiling salted water and simmer until tender
Add the fat and mix in well, cover the pot, and let rest for a few minutes.
Required cooking time is up to 2 hours.

Monday, April 8, 2013

Cooking in the Trenches: Part 2, German Army 1915

I've been MIA for a bit, just a bit overwhelmed by everything going on at one time. But I have also been working on a number of projects which are coming to fruition, and will soon be published in this blog.
In this post we'll take a look at more recipes from the German trenches of WWI: rice, vegetables, sauces, and more potatoes. But first I thought it might be helpful for those unfamiliar with equipment of that era to give a brief overview of individual German mess gear in the First World War.

  The German Kochgeschirr M.1887 was rather massive for an individual mess kit. With a 2.5 liter capacity, it had nearly 1.5 times the volume of the later M.31 Kochgeschirr. Some M.1887s were still in use at the outbreak of the First World War.

Kochgeschirr M.1887
It was replaced by the Kochgeschirr M.1910 model, with a reduced capacity of 2 liters. An interesting development at that time was a folding spoon and fork eating utensil (the Essbesteck ,German for cutlery) and perhaps the first mass-produced spork. The M.1910 Kochgeschirr had a small metal lug on the inside the body to hold the Essbesteck neatly for transport (see illustration below). 

Kochgeschirr M.1910

Reichswehr soldiers in 1932 chowing down.
 This photo gives one a good idea of the size of the M.1910-type mess kit.  

Here are a few more recipes from Kochbuch für den Schützengraben (Cookbook for the Trenches). If you are striving for authenticity, when a recipe calls for bread crumbs it would normally have been a coarse 100% rye bread. 

Potatoes
As mentioned in an earlier post, the potato daily ration was 1,500 grams, which of course could vary greatly due to disruptions in the supply chain. As with most of the recipes in Kochbuch für den Schützengraben, no amounts were given for potato recipes. 

Mashed Potatoes
Force boiled potatoes through a sieve. Add a little milk and salt.

Mashed Potatoes (Baked)
Mix plenty of fat and grated cheese into mashed potatoes.
If eggs are available, separate the eggs and beat the egg whites until they form soft peaks.
Mix the egg yolks, fat and grated cheese into the warm mashed potatoes, then fold in the egg whites.
Sprinkle cheese and butter on top.
If baking in an oven, bake uncovered like a casserole in a 350°F/205°C oven.
If cooking on an open fire, use a heavy lidded container such as a Dutch oven. Cook over hot coals with more coals on top.
Cook until heated through and lightly browned on top.

Instead of the cheese add sugar to taste to about half a pound of potatoes per serving.
Add fruit sauce, apple sauce, stewed fruit or other cooked fruits.
Bake as for the baked mashed potatoes.

Mashed Potatoes (Croquettes)
Form cooled mashed potatoes in balls the size of an egg, roll in beaten egg then in bread crumbs. Fry in hot fat.

Apple Potatoes:
Peel and cut up or grate the potatoes.
Cooked until the potatoes are slightly undercooked.
Add an apple that has been peeled and cut into small pieces.
Add some fried bacon bits.
Cook until the apple and potatoes are soft.

Sauces
Sauces were an accompaniment to many of the recipes in Kochbuch für den Schützengraben. Roux was made with a tablespoon of butter or other fat, such as lard, oil, or bacon grease. The fat was heated until melted, a spoonful of flour added, mixed into a smooth paste, and then the other ingredients were added to it. If flour was not available, a handful of crumbled bread was substituted.
  
Béchamel Sauce:

Ingredients
fat
sliced ​​ham, pepper, onion.
broth or water
cream or milk.
bread crumbs
salt (if needed)
grated cheese, if available.

Procedure
Chop the ham, peppers and onion into small pieces.
Heat the fat and add the sliced ​​ham, pepper and onion.
Cook over low to medium heat until softened.
Add a little broth or water and cream or milk.
Add bread crumbs, salt (if needed), and a little grated cheese, if available.

Tomato Sauce
Ingredients
fresh tomatoes
butter or water

Procedure
Cut up the tomatoes into large pieces.
Place tomatoes in a pan with a little butter or water.
Cook over low to medium heat,
Once the tomatoes have softened, force them through a sieve to remove the seeds and skin.
Boil the tomatoes (stirring constantly) until they have thickened into a paste.
To the cooked tomato paste add a little water or broth, butter and bread crumbs.

This tomato paste (or canned tomato paste) is excellent with eggs, beef, mutton, meatballs, or the like. It also makes a very tasty addition to rice, pasta or macaroni.
Tomato soup can be made by adding broth to the tomato paste.
  
Mustard sauce:
Ingredients
butter or other fat
meat stock (use fish broth if serving sauce with fish)
2-3 tbsp mustard
bread crumbs
egg yolk

Procedure
Bring the stock or broth to a boil.
Remove from heat and add a little bit at a time to the egg yolk while stirring (to temper the egg yolk and prevent it from curdling).
Place butter, stock, mustard and bread crumbs in the pan.
Over low heat, bring the sauce to a simmer while stirring constantly.
Remove from heat, allow sauce to cool slightly; add the egg yolk while stirring vigorously.
Optional: add a little sugar and vinegar, to taste.

Rice
     The rice recipes are scaled for one portion. According to WWI German Army daily ration tables, 125 grams or rice or 250 grams of pulses (peas, beans, or lentils) could be substituted for 1500 grams of potatoes. Buckwheat, oat groats, or other grains can be used in the same way as rice in any of the following recipes.

Risotto
     Of course this is not the “proper” method of cooking risotto, but classic risotto made with Arborio rice could hardly have been expected to be prepared in a trench under combat conditions. Any type of rice may be used, but preferably it should be a short-grained, starchy variety. You will need to use a sufficient amount of meat stock so that the cooked rice is a bit more wet and sticky than steamed rice.

US                               Metric              Ingredients
4.4 oz/5 fl oz               125 g/150 ml      short-grained rice
10-12 fl oz                   300-360 ml        meat stock (amount depends on the type of rice)
to taste                        to taste               grated cheese
to taste                        to taste               salt

Optional
½ fl oz/1 tbsp              15 ml               tomato paste
to taste                        to taste            meat scraps, chicken liver or mushrooms (canned or                                                                  
                                                         cooked)
Procedure
Heat fat in a saucepan and add the dry rice.
Stir until the rice grains are coated with fat.
Add the meat broth, bring to a boil, lower heat and cook for twenty minutes.
When it is nearly cooked, add plenty of grated cheese.
At this point, also add the tomato paste, meat scraps, chicken liver or mushrooms.

Variations
Rice can also be baked in a covered pan that has been greased with butter or other fat, as in the potato dishes.

Apple Rice 
Ingredients
4.4 oz/5 fl oz               125 g/150 ml   rice
8-10 fl oz                     120-300 ml      meat stock (amount depends on the type of rice)
½ - 1 tbsp                    15-30 ml          butter

Procedure
Put the rice, water and butter in a covered pan.
Boil or steam the rice until soft, about 20-25 minutes.
While the rice is cooking, chop the apples into 3/8 inch (1 cm) pieces.
Add the chopped apples to the cooked rice.

Vegetables

Brassicas (cabbage, broccoli, cauliflower, Brussels sprouts) can be cooked until soft in boiling water, drained, and then simmered with a little meat broth or water, fat, and salt to taste.
Young green beans, peppers, cabbage, carrots, asparagus, chicory, Brussels sprouts, etc. can be cooked until soft with a little water and salt. Drain, serve, dot with pieces of butter.
Asparagus: serve with melted butter.
Chicory:  pour over with melted butter, sprinkle with grated cheese.
Spinach: bring one or two spoonfuls of water to boil, add the spinach and heat until boiling. Remove from heat and add a little butter or anchovy paste.
Kale: boil, drain, then chop up and cook in a little fat until soft.
Red or white cabbage: Cut into thin strips. Bring a little water to a boil and steam the cabbage until soft. Add a little fat and some finely chopped apples. Cook until the apples are soft.
Cauliflower: boil until soft and serve with Hollandaise sauce.
Beets (all varieties): boil until soft, broth with fat and bread crumbs made ​​creamy.
Dried peas, beans, and lentils: boil until tender. Add tangy sweet bacon gravy (refer to my earlier post for the recipe).

Sources
Kochbuch für den Schützengraben, Hans Werder, Otto Janke Publisher, Berlin, 1915

http://fi.wikipedia.org/wiki/Kentt%C3%A4keittoastia
http://www.ir63.org/index.php?page=33
http://www.wehrmachtlexikon.de/heer/waffen/ausruestung/allgemeine/essbesteck.php


Monday, February 25, 2013

Constructing a British Army Improvised Cooker


     In an earlier post I addressed the basics of improvised cooking equipment in the British Army. I find it to be a fascinating aspect of field cookery, and decided to recreate a working example. Most manuals were terribly lacking in details, but I found a good resource for construction techniques in the British Home Office’s “Civil Defence Manual of Basic Training, Volume 1, Welfare Section”, published in 1952. In the aftermath of nuclear, biological and chemical warfare and the resultant destruction of infrastructure and disruption of essential services, it was expected that large segments of the population would be in need of basic necessities.  The Home Office turned to the British Army for a solution to the problem of mass feeding.
     The Civil Defence Manual of Basic Training stated that “The improvised equipment illustrated has been successfully used for many years by the British Army and all of it can be made, at very little cost, from scrap material.” I found this to be absolutely true. The cooker was constructed entirely from scrap material that I had on hand, with the exception of two cans of high-heat enamel spray paint. High-heat enamel may not be historically correct, but I want to extend the service life of my cooker for as long as possible.
     Very little was required in the way of tools, as all of the tasks could be accomplished with simple hand tools. The only power tools I used were a drill for the oven handle (4 holes) and a jigsaw to expedite cutting of the sheet metal metal-cutting shears worked fine, but were much slower). Pug was mixed with a hoe and cement tub. Steel bars were cut with a hacksaw. British Army manuals recommended “running over repeatedly with a lorry” to flatten the corrugated metal sheets. Not having an army lorry readily available, I flattened the corrugated sheets by pounding repeatedly with a big hammer (very time consuming and admittedly not a lot of fun, but it provided great stress relief).


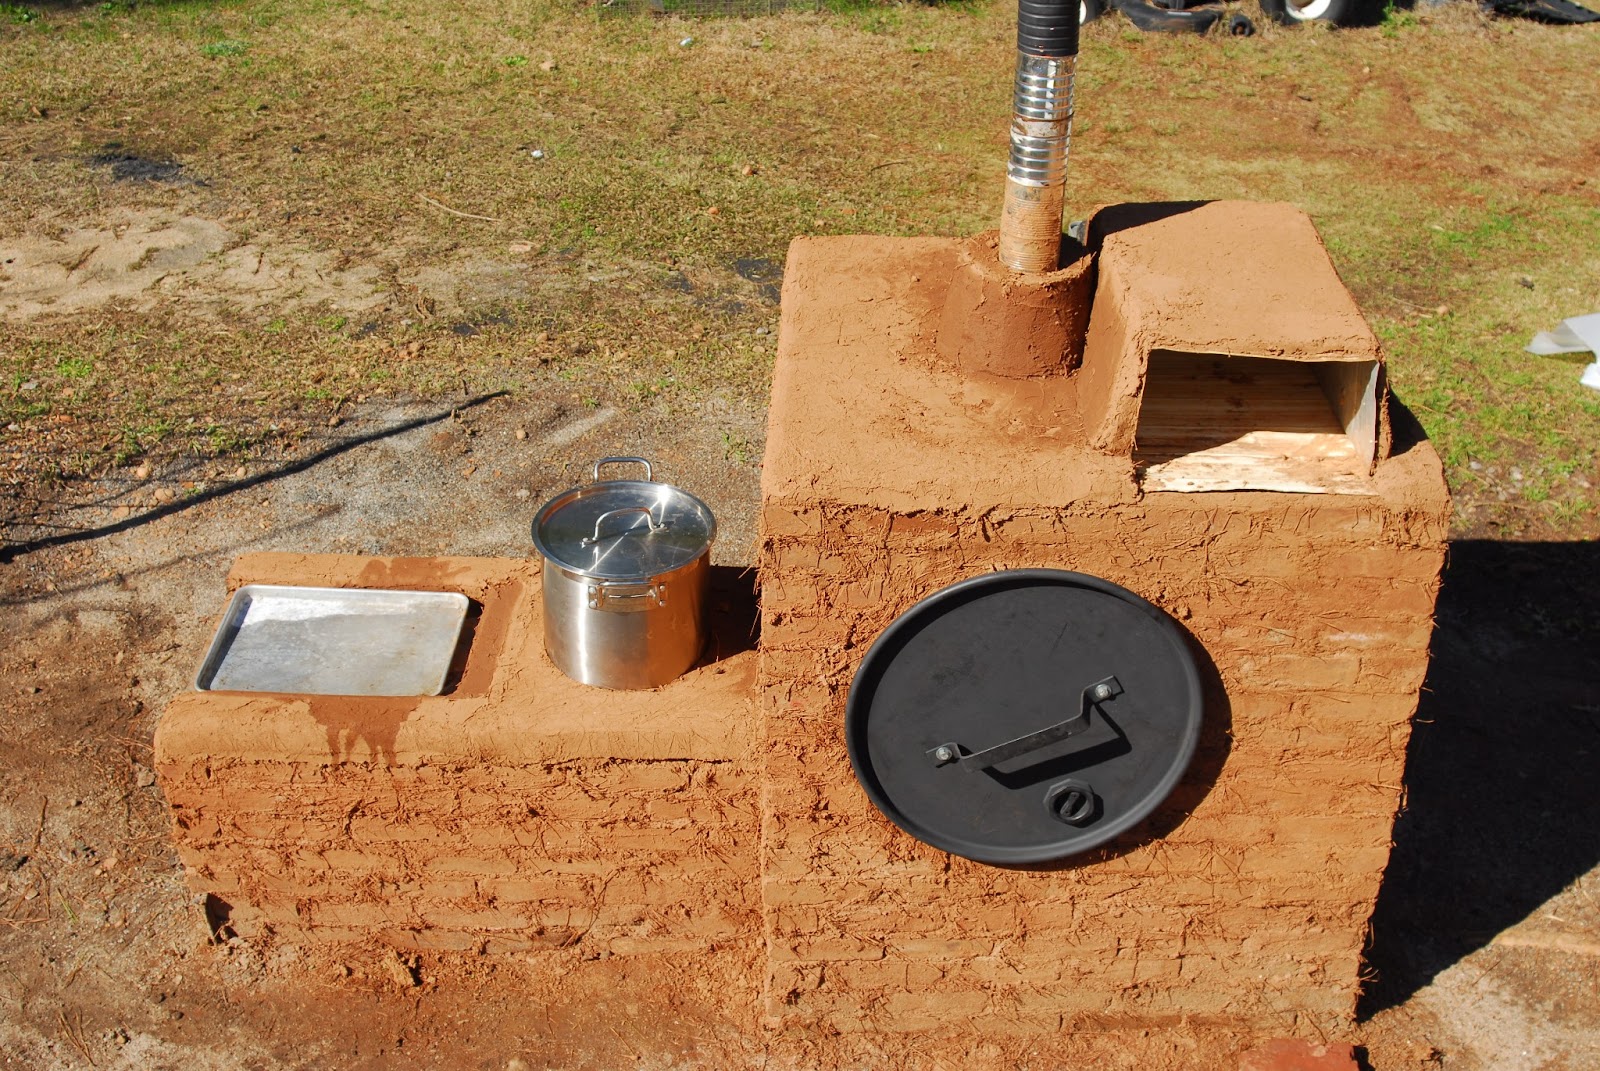
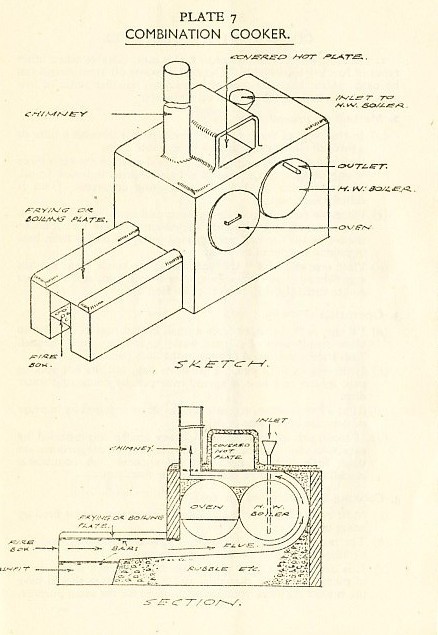
    My example is a combination cooker, but without the water boiler. Alternately, it could be considered an “oven with frying plate”, but with a longer frying plate. It has the following features for cooking:
1. A flat area to place pots or pans for boiling or frying, known as the “boiling/frying plate”.
2. An oven made from a metal drum.
3. A covered hot plate or hot cupboard for keeping cooked foods warm.
4. A hole in the boiling/frying plate to accommodate a stock pot, as would be done with a camp kettle. British Army 3-gallon camp kettles had tapered sides and would not fall through the hole. I just cut the hole slightly smaller than the pot. Pug was placed around the camp kettles or pots for insulation. 
    
     There were many adaptations of the given designs and, if I understand the instructions of the manuals correctly, the designs do not have to be adhered to unquestioningly. They could be modified to accommodate local requirements and available resources. My intent was to demonstrate the technique for building improvised field cookers. As expected, I encountered many issues not sufficiently described in manuals. These details could only be worked out by actually working my way through the construction. 
     One aid to determining many of the dimensions was in counting the bricks in photos of improvised field cookers. British Imperial bricks were most likely used, and they fit in quite well with the given measurements.
 However, I had to modify the dimensions slightly to take into account the smaller size of US bricks:
Imperial bricks (excluding joints) - 8-5/8 x 4-1/8 x 2-5/8 inches (L x W x H)
U.S bricks (excluding joints) - 8 x 4 x 2¼ inches (L x W x H)
So for example, instead of using 6 courses of bricks to achieve the proper height of the boiling/frying plate, I had to use 7. To further complicate the process, most of my bricks were locally produced and often quite old, so there were some additional minor variances in the sizes. 

When building a cooker, there are several important design considerations which should be followed to insure proper functioning:
1. The ground should be reasonably level and firm.
2. The firebox should not be more than 10 inches wide by 24 inches long and 9 inches high.
3. The firebox uses grating, grid, or perforated sheet metal, not more than 3/8 inch thick.
4. The chimney hole is centered over the top of the barrel oven.
5. The height of the chimney (from the top of the chimney to ground level) should not be less than the horizontal length of the flue.
6. Boiling/frying plate is a piece of sheet metal, not more than 3/8 inch thick.
7. Boiling or frying plate sections, kettle trenches are approximately 24 inches wide. 
8. The oven is made from a 55 gallon drum or other metal drum, preferably food-safe. It is recommended to burn out the inside of the barrel before use. Do not use a barrel that contained toxic substances. Contrary to the techniques described in the Home Office Civil Defence manual, it is not recommended to use galvanized trash cans for ovens.

Here are a few helpful hints for construction: 
1. Soak the bricks in water before laying. This prevents the bricks from absorbing too much water from the pug and possibly weakening the joint.
2. Pug is sifted earth, preferably clay-type soil, mixed with enough water until it is the consistency of thick oatmeal. Chopped dry grass or straw should be added as a binder. The amount of straw added will vary with the soil type.
3. Estimate the amount of soil that you will need, and then double that. I used about 10 cubic feet of sifted soil for my cooker, much more than my original estimate.
4. Use gloves whenever you are cutting, bending or handling sheet metal. The cut edge of sheet metal can result in a really nasty cut. 

Should you wish to indulge in constructing your own improvised cooker, you are responsible for your safety, fire prevention and compliance with local laws. Any recreation of the techniques given here is taken at your own risk. 

And now that we have the obligatory legal disclaimer out of the way, let's see how it was done.
I leveled the area, tamped the soil, measured and set out marking stakes. Then I laid out the first course of bricks (dry) to get a more exact idea of the layout. 
Note the materials laid out next to the construction area: bricks, sheet metal, metal rods, sifted soil (in the black nursery pots), chopped pine straw (in the galvanized trash can), and a 55 gallon drum.


A layer of pug is spread on the ground. Note that the near side is twice as wide as the rest. This is to accommodate the inner wall which will be the support for the closed end of the drum oven. Fortunately, for the pug I have a nearly endless supply of sticky of Alabama red clay soil and pine straw, which doesn’t deteriorate as quickly as dried grass or wheat straw.

Lay out the first course of bricks, putting about a 3/8 inch (1 cm) layer of pug in between each brick. Note that the bricks on the open end (on the right) are half bricks. The bricks are “keyed”: they are laid so that each course has the joint between two bricks centered over the middle of the bricks on the course below it.
The bottom course for the inner wall is also laid.
Put a 3/8 inch layer of pug on top of the first course and continue to lay each successive course.

After four courses are laid, the firebox grate is added, and the 5th course of bricks over it.

Close up detail of the supports for the firebox. Optionally, a metal grid or perforated sheet metal can be placed on top of the 4th course bricks, without the support rods. By using support rods, I can easily replace the firebox grid once it deteriorates through use. 
Continue until 7 courses have been laid. Build up an inner wall as shown in the photo above, to the height of the frying/boiling plate section. This is to support the closed end of the drum oven.

View from the front of the cooker.
Note how the grates are laid over the support rods to create a firebox, and the inner support wall to the left rear.

Another view of the cooker after the 7th course has been laid.
Before continuing, the base of the flue is filled in. Rubble was normally used, but I had a large amount of coarse gravel available. I laid a short retaining wall at the rear of the firebox to keep the flue material in place.

The flue slopes upward from the front of the cooker to the rear.
(Before filling in the flue, I laid down a sheet of permeable landscape fabric. This fabric is not necessary, but it serves as a barrier to insects (fire ants are a problem here) and to make clean up easier if the cooker is disassembled or moved.)

A layer of pug or sheet metal is placed over the flue base. 
As I will be using a rather thin sheet of corrugated steel for the boiling/frying plate, I needed to add some steel rods for support. If a thick sheet of steel is not used, reinforcement must also be added for the front wall of the oven section which spans the flue. Those are the two long rods on the left side. I spaced the short rods evenly, except for the large gap towards the left. The opening for a stock pot will occupy this space.

The top of the seventh course is the height of the boiling/frying plate, which is laid over a layer of pug on top of the 7th course. A hole has been cut for the stock pot. Originally, this would have been an oval opening to accomodate a camp kettle. The bricks on top of the plate are temporary, to hold the plate in position.

Next we turn our attention to the oven section. Lay several bricks for the next course of the forward oven wall and on the ends of the inner wall, to prevent the drum from rolling. A thick layer of pug is put down where the drum will rest and formed to the curve of the drum. 

Detail of the rear (closed) end of the drum. The inner wall is used for supporting the rear end of the drum. Continue to lay bricks around the barrel, making sure that the courses are keyed. Use broken or cut pieces of brick to insure a snug fit around the front of the barrel.

Ten additional courses of bricks have been laid to enclose the drum oven. Pug is used to seal around the curve of the barrel. Before the last course was laid, reinforcement was added over the top of the drum oven for the bricks that spanned it in the last (10th) course.

Two concrete reinforcing rods are set in a layer of pug on top of the top brick course. They will help to support the weight of the pug on top of the sheet metal.

A piece of sheet metal is placed over the top of the oven, and temporarily held in place with bricks.
Note the hole cut for the chimney, centered over the drum.

 Close-up detail of the chimney hole.
The material in the hole was cut and bent upward to form flanges to help secure the chimney.

 I greased the bottom half of a stock pot with cooking oil to make removal and cleanup easier. The pot was set in place over the hole in the boiling/frying plate. A layer of pug about 3½ to 4 inches (9-10 cm) deep was formed around the pot.
The sides of the frying area are then constructed from pug.
I used a rather stiff mixture of pug for the boiling/frying area. 
The stockpot has been temporarily removed to show the hole in the boiling/frying plate.
The chimney is made out of 4 inch (10 cm) diameter cans.
Both ends are cut off and one end is crimped with needle-nose pliers. The crimped end is inserted into the non-crimped end of the next can, and carefully
tapped in further with a rubber mallet until it is secure. Do not use excessive force, or you will bend the cans. If done properly, a sufficient length of stovepipe can be fabricated that is both straight and secure.
Formed out of sheet metal or a square tin, a hot cupboard was used as a food warmer. My example is constructed out of sheet aluminum. It will be mounted on top of the oven and covered with pug. 
The hot cupboard was secured in place and covered with pug. A section of chimney was put on the flange and a support built up around it. The support could be a column of bricks or pug. I cut the bottom off of a plastic nursery pot which was then, inverted, centered it over the stovepipe and filled with pug.

 View from the front.
I sized the frying plate and hot cupboard to accommodate a half sheet pan (approx. 13 x 18 inches).


The completed combination cooker. 
The handle for the oven lid was fabricated from a piece of flat steel that I cut to size, forged into shape and drilled for mounting bolts. The barrel has a clamp to hold the lid. If you are using a lid without a clamp, latches will have to be added to hold the lid in place.

The cooker with the chimney removed and the oven opened. The oven rack is a bit small, but will suffice for now. I plan on making a larger rack that will set higher up in the oven and provide more space.
View from the rear of the cooker. Although the firebox opening faces the direction of prevailing winds for this area (west), today the wind refused to cooperate and blew in from the east. I’ll have to do another test firing later in the week, especially to determine if the 4-inch diameter chimney is sufficient or whether I may need to increase the size.

Sources:
Manual of Military Cooking and Dietary, 1924. H.M. Stationery Office, 1924
Manual of Military Cooking and Dietary, Part I - General. H.M. Stationery Office, 1940
Manual of Army Catering Services 1945, Part III. The War Office, 1945
Manual of Army Catering Services 1954. The War Office, 1954
Civil Defence Manual of Basic Training Volume 1 Welfare Section  (Improvisation of Large Scale Cooking Equipment), Pamphlet no. 2B. H.M. Stationery Office, 1952

Wednesday, February 20, 2013

Improvised Cookers, British Army, WWI and WWII


     British Army cooks in the latter part of the 19th century and throughout the 20th century were, in my-not-always-so-humble-opinion, the masters of improvised field cooking. They were trained to build an impressive array of improvised field stoves, ovens, fryers, boilers and water heaters, heated by wood, oil, coal or gasoline (petrol). Walls were made of bricks mortared with mud or of metal tins filled with earth or stones. Sheet metal plates were used for stove surfaces, and oil drums for ovens and hot water boilers.
     This post is an introduction to some of the many types of improvised cookers used by the British Army in both world wars.  I am unsure of the year of introduction of all of the types illustrated here, but am fairly certain that the Kettle Trench and Camelback Kettle Trench were in existence by the end of World War I. All of the types illustrated were in use before the end of World War II. In the 1950's the Civil Defence Department of the Home Office gave new life to the art of constructing improvised cookers as designed by the British Army. They were an ideal solution to the problem of feeding large numbers of people in the aftermath of nuclear or chemical weapons attack, and were included in Civil Defence training manuals of the time.


“Boiling and /or Frying” cookers were a simple design. They consisted of two low side walls, a fire box, flue, chimney and a sheet metal plate upon which cooking vessels were heated. The firebox used a metal grate, perforated sheet metal, or metal bars. Any type of combustible material could be used for heat. Bricks were held together with pug, a mixture of clay soil and dry grass, hay or straw.


   At this point I need to digress a bit and offer a description of the "camp kettle". Throughout much of the 20th century, a mainstay of British field cookery equipment was the camp kettle, more commonly referred to as a “dixie”. The camp kettle was an oval cooking pot with a 3-gallon capacity, lid, and a bail handle. Versions used through WW2 were tinned sheet metal. Leter versions were made of aluminum. They were used for cooking and for transporting prepared rations to the front lines. In addition to several types of improvised cookers built specifically to utilize the camp kettles, they were also employed in several types of combination cookers.  
Aluminum camp kettle.
Note the flanges on the side.


Dixies being used to transport cooked rations to 
the trenches on the Western Front, WWI.


Using the same basic design as the boiling and/or frying cooker, a hot water boiler could be constructed with an oil drum and two short pieces of pipe, for the water inlet and outlet. The water outlet was placed near the top of the drum and left open. Cold water would have to be added through an inlet at the top in order to draw out hot water, insuring that the drum remained full.


Taking the design a step further, the features of different types of cookers were joined together to form “combination cookers”. A combination cooker could consist of an oven, frying /boiling plate, hot water boiler, and a covered hot plate to keep food warm.

This is the Civil Defence version of a "Combination Boiling Plate and Oven". The oven section is narrower, as it uses a 24" tall dust bin (trash can) for the oven. If an oil drum were used, the oven section would be approximately 12-16 inches wider than the boiling plate section. 

   Improvised field cookers became increasingly sophisticated and varied in design. Larger and more complex units were built to feed larger units.
The "Camelback" Kettle Trench was one of the more unusual and complex  variants of the improvised field kitchen.
It included an oven, hot water boiler, and space for 3 dixies.

One of the larger types of improvised field ovens.
This version of the Kettle Trench was constructed from empty biscuit or petrol tins filled with stones, mud or sand.
Petrol tin construction was especially useful in areas such as North Africa and the Middle East, which lacked clay soil and water was generally in short supply. 
    What I have presented here is only a portion of the designs of British Army improvised cookers. In my next post I will demonstrate the construction techniques, using the design of an improvised combination cooker. I am nearing completion of a full-sized, and will post the details once I have tested it (hopefully tomorrow!).

A sneak preview of my combination cooker under construction.
Sources:
Manual of Military Cooking and Dietary, 1910 (reprinted 1915). H.M. Stationery Office, 1915
Manual of Military Cooking and Dietary, 1924. H.M. Stationery Office, 1924
Manual of Military Cooking and Dietary, Part I - General. H.M. Stationery Office, 1940
Manual of Army Catering Services 1945, Part III. The War Office, 1945
Manual of Army Catering Services 1954. The War Office, 1954
Civil Defence Manual of Basic Training Volume 1 Welfare Section  (Improvisation of Large Scale Cooking Equipment), Pamphlet no. 2B. H.M. Stationery Office, 1952