
This post is an introduction to some of the many types of improvised cookers used by the British Army in both world wars. I am unsure of the year of introduction of all of the types illustrated here, but am fairly certain that the Kettle Trench and Camelback Kettle Trench were in existence by the end of World War I. All of the types illustrated were in use before the end of World War II. In the 1950's the Civil Defence Department of the Home Office gave new life to the art of constructing improvised cookers as designed by the British Army. They were an ideal solution to the problem of feeding large numbers of people in the aftermath of nuclear or chemical weapons attack, and were included in Civil Defence training manuals of the time.


“Boiling and /or Frying” cookers were a simple design. They consisted of two low side walls, a fire box, flue, chimney and a sheet metal plate upon which cooking vessels were heated. The firebox used a metal grate, perforated sheet metal, or metal bars. Any type of combustible material could be used for heat. Bricks were held together with pug, a mixture of clay soil and dry grass, hay or straw.

At this point I need to digress a bit and offer a description of the "camp kettle". Throughout much of the 20th century, a mainstay of British field cookery equipment was the camp kettle, more commonly referred to as a “dixie”. The camp kettle was an oval cooking pot with a 3-gallon capacity, lid, and a bail handle. Versions used through WW2 were tinned sheet metal. Leter versions were made of aluminum. They were used for cooking and for transporting prepared rations to the front lines. In addition to several types of improvised cookers built specifically to utilize the camp kettles, they were also employed in several types of combination cookers.
 |
| Aluminum camp kettle. Note the flanges on the side. |
 |
Dixies being used to transport cooked rations to
the trenches on the Western Front, WWI.
|

Using the same basic design as the boiling and/or frying cooker, a hot water boiler could be constructed with an oil drum and two short pieces of pipe, for the water inlet and outlet. The water outlet was placed near the top of the drum and left open. Cold water would have to be added through an inlet at the top in order to draw out hot water, insuring that the drum remained full.

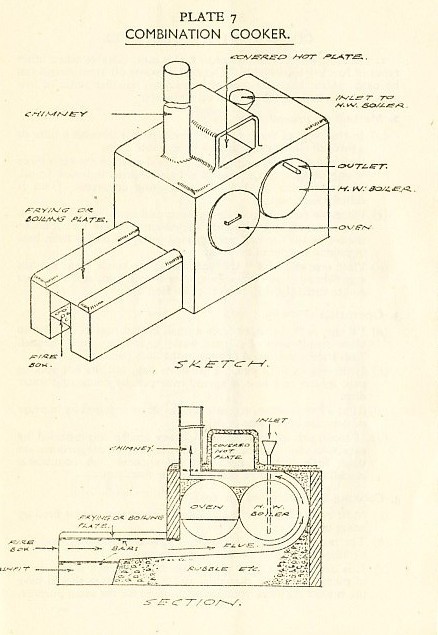
Taking the design a step further, the features of different types of cookers were joined together to form “combination cookers”. A combination cooker could consist of an oven, frying /boiling plate, hot water boiler, and a covered hot plate to keep food warm.
 |
| This is the Civil Defence version of a "Combination Boiling Plate and Oven". The oven section is narrower, as it uses a 24" tall dust bin (trash can) for the oven. If an oil drum were used, the oven section would be approximately 12-16 inches wider than the boiling plate section. |
Improvised field cookers became increasingly sophisticated and varied in design. Larger and more complex units were built to feed larger units.
 |
| The "Camelback" Kettle Trench was one of the more unusual and complex variants of the improvised field kitchen. It included an oven, hot water boiler, and space for 3 dixies. |
 |
| One of the larger types of improvised field ovens. |
 |
| This version of the Kettle Trench was constructed from empty biscuit or petrol tins filled with stones, mud or sand. Petrol tin construction was especially useful in areas such as North Africa and the Middle East, which lacked clay soil and water was generally in short supply. |
 |
| A sneak preview of my combination cooker under construction. |
Manual of Military Cooking and Dietary, 1924. H.M. Stationery Office, 1924
Manual of Military Cooking and Dietary, Part I - General. H.M. Stationery Office, 1940
Manual of Army Catering Services 1945, Part III. The War Office, 1945
Manual of Army Catering Services 1954. The War Office, 1954
Civil Defence Manual of Basic Training Volume 1 Welfare Section (Improvisation of Large Scale Cooking Equipment), Pamphlet no. 2B. H.M. Stationery Office, 1952
Very informative information. The WWI living history group I belong to is thinking about building on of these. I do have some questions for you. 1. Why do you recommend NOT using a galvanized trash can? 2. Since you used a steel drum in the construction of yours, how has it held up to the elements (primarily rusting). I ask this as we want to be sure we are choosing the best option for the oven. Thanks, Rob
ReplyDeleteHi Rob,
DeleteI researched the use of galvanized cans, and several sources cautioned against the use of dry, high heat in galvanized cans. Apparently, when heated the metals used to coat the can (zinc, etc.) can give off some potentially harmful fumes. I like to err on the side of caution. I found some food-safe 55 gal drums and scrubbed them out well.
Question number 2, it has held up quite well to the elements. I admittedly haven't fired up the cooker too many times, it takes a while and a lot of wood to get the oven up to temp, and I had to install a larger diameter (6"/15 cm) stovepipe for better airflow. I live in southern Alabama: lots of rain in the spring and fall, very hot and humid for much of the year. I covered the cooker with a plastic tarp, and despite the moisture levels it has held up surprisingly well. There is very little rust on the barrel, as I painted the entire exterior with heat-resistant paint before bricking it into the cooker. I expected to see rapid deterioration in the mud & straw mortar due to the moisture, but even that has held up extremely well after about 18 months.
I recommend using heat-resistant paint on the exterior (non-food contacting) metal surfaces and to keep the whole thing coverd while not in use. If you do that, it should give you quite a number of years of use. Another hint, estimate the amount of mud you'll need and then double it. I was repeatedly having to go back for more clay soil, as it used up quite a bit more than I originally thought.
But I did have quite a lot of fun building it, and it was not as problematic as I first imagined. Good luck with your project, let me know how it works out and please send some pictures.
Thanks for stopping by,
Peter
Peter:
ReplyDeleteGreat post and blog. I was wondering if you have researched / Googled "Rocket Stoves". They are very similar to these designs. What I find funny is that they are being touted as a new design. I wonder if they were re-discovered, or if someone just copied an old manual.
Peter...we just built an improvised cooker this past weekend. It has a 2 foot skillet plate and double oven. I'd be more than happy to send you some pictures if you'd like to see how it came out.
ReplyDelete